This is an excerpt from “Chairmaker’s Notebook” written and illustrated by Peter Galbert.
The association between lathe turning and Windsors runs deep. When describing a Windsor chair to someone, the “ornately turned legs” often pinpoints the style in their mind. Turning is an ancient method for shaping wood that has seen little improvement (the motor is one) in centuries. It is the fastest way to transform rough wood into finished parts with perfectly sized joinery. Entire books have been written about the various techniques of creating the shapes so often associated with the Windsor style. For our purposes, though, there is some specialized knowledge that comes with turning chair legs from split wood that is worth highlighting. At the end of this chapter are options for making legs and parts with limited or no use of a lathe.
Turning Design
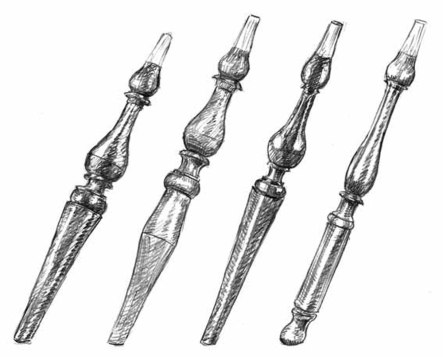
The origin of a chair can often be traced county by county based on the style of its turnings. Whether bold and voluptuous or sleek and reserved, the turnings create a distinct attitude. The earliest American Windsors had baluster turnings in what would most likely be labeled as “high style” for the Windsor. When presented with a Windsor chair that doesn’t have baluster turnings, many viewers will question whether it’s a Windsor at all, which shows how deep the association between the balusters and Windsors runs. There is a basic order of the elements found in most balusters, but the size of the parts and variation between thick and thin areas give a lot of opportunity for personal expression.
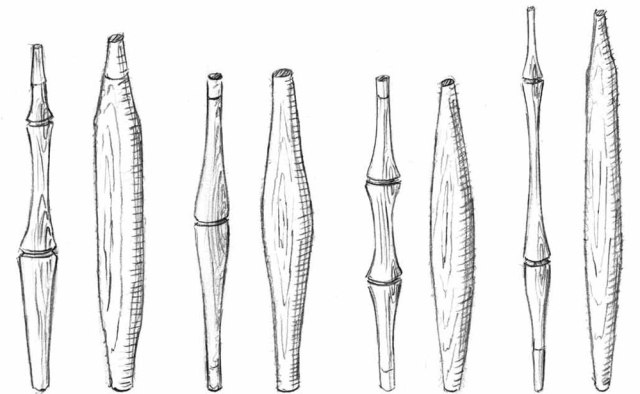
After the early 19th century, the influence of Asian art can be seen in the simpler forms and “bamboo” style. While the baluster might be “high style,” I think that sleek double-bobbin and bamboo-style turnings fit well with a wider range of decor, which may have added to the breadth of interest and longevity of the form.
This chapter will guide you from preparing stock to turning parts and joinery. For more information on turning tools and technique, look to the chapters Turning Tools as well as Turning Practice.
Stock Preparation
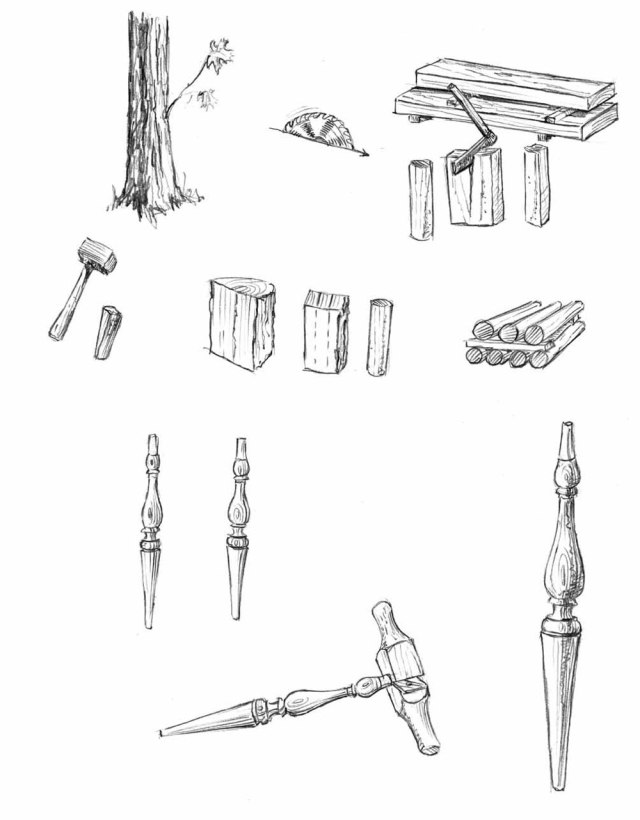
Making successful turnings has as much to do with preparing material as with using sharp tools and good technique. While starting with a straight tree is the first step for all of the parts, there are many different paths to processing the wood for turning. You can split or saw it, you can turn parts green, or dry them before turning. It depends mostly on issues surrounding storage, time restraints and personal preference.
Regardless of path you choose, the end product should achieve three important results:
• For strength, the parts should be made up of straight fibers that run from one end of the piece to the other.
• During assembly, the portion of a turning that will have a mortise should have a higher moisture content than the tenon that will join it.
• The tenon portion should be kiln-dried when it is sized, shaped and assembled.
There are many routes to meeting these requirements, and none is wrong as long as you find the process convenient and the joints are formed and assembled when the wood is at the correct moisture content. But don’t get overwrought about moisture content; you don’t need thick pamphlets or confusing charts to get the job done right.
When drying the small tenon ends of roughed parts, it takes only a few days to dry green wood enough to go into the kiln and then just a few more until it stops shrinking. I measure the shrinkage across the tangential plane periodically until it stabilizes, which is accurate enough to know when to stop the process. I rarely shape the final turnings from green wood due to storage and movement issues, but my process always begins with green wood, so I will start the explanation of the sequence of turning and drying from the log. There is more information on wood selection in the Woods for chairmaking chapter and splitting technique in the splitting Parts from the Log chapter.
Wood can be stored indefinitely once air-dried and suit all chairmaking needs, so if processing the parts is ever confusing, just remember that air-drying a part, or a lot of parts, is always a safe bet.
If you have never turned green wood, then I highly recommend you try it. There is no way to describe the fun of making shavings peel like a ribbon and pile at your feet as you glide along. Like bending wood, it’s a rare moment where the interaction with the wood transcends all expectation and sets a new awareness for this amazing material and process.
When starting from a log, I either split out the parts or have the log sawn into planks of varying thickness. If I am having boards sawn, I sticker and stack them to dry and use them whenever I need them. If I am splitting billets from the log, I consider the season and, if necessary to avoid spoilage, process the entire log into rounds for later use. There is more information in the splitting Parts from the Log chapter.
I split billets about 3 ∕8″ to 1 ∕ 2″ oversized, then I cut them to an appropriate length and turn them round. If I am going to let them air-dry before completing the final shaping, I will round them down to about 1 ∕ 4″ oversized, which should allow me plenty of room to turn them to round after they shrink to oval while drying. because all of my turnings have ends with reduced diameters, I turn my blanks with tapered ends, which allows the end grain to be exposed down the length of the piece. This helps the parts dry fast and evenly, especially at the ends where they are sized for joints.
If I am going to turn a part to its final shape while the wood is still green, I oversize all the dimensions on the design pattern of the details at least 1 ∕ 16″ to allow for shrinkage. The parts with a larger diameter will shrink more, so you might consider stepping them up a bit more. For the cylindrical tenons on the ends of the stretchers that will end up 5 ∕ 8″ diameter (.625″), oversizing them to .680″ (about 11 ∕ 16″) is a safe amount.
— MB