The following is excerpted from “With All the Precision Possible: Roubo on Furniture Making,” by André-Jacob Roubo, translated by By Donald C. Williams, Michele Pietryka-Pagán & Philippe Lafargue.
Since the most exotic woods are very expensive, and for the most part difficult to work, one rough cuts them with a saw, in both their thickness and width, in order to conserve the materials by making the least waste possible, and at the same time to diminish [dress] them most easily, given that much cannot be done except by the toothed plane, at least for making them the correct size, which one cannot do with the [jointing] plane, given that these woods are often very hard, or which is even worse, of a curly grain, the iron of the standard/jointing plane cuts very little into it, causing tear-out [splinters] such than one could not remove without doing wrong to the different pieces which would be found to be too thin or too narrow. What’s more, this type of joinery being made to be polished, it is necessary that no voids be found in the entire surface, either along the length or width, which, consequently, requires the use of toothing planes, at least for the wood of an extremely hard quality, or of a grain mixed with burls, as I just said before. The wood which is less hard and more straight-grained than those of which I just spoke, one removes the material [dresses them] with jointer planes and in the ordinary manner. However, one will do very well to finish them with toothing planes, in order to avoid all types of tear-outs on their surface.
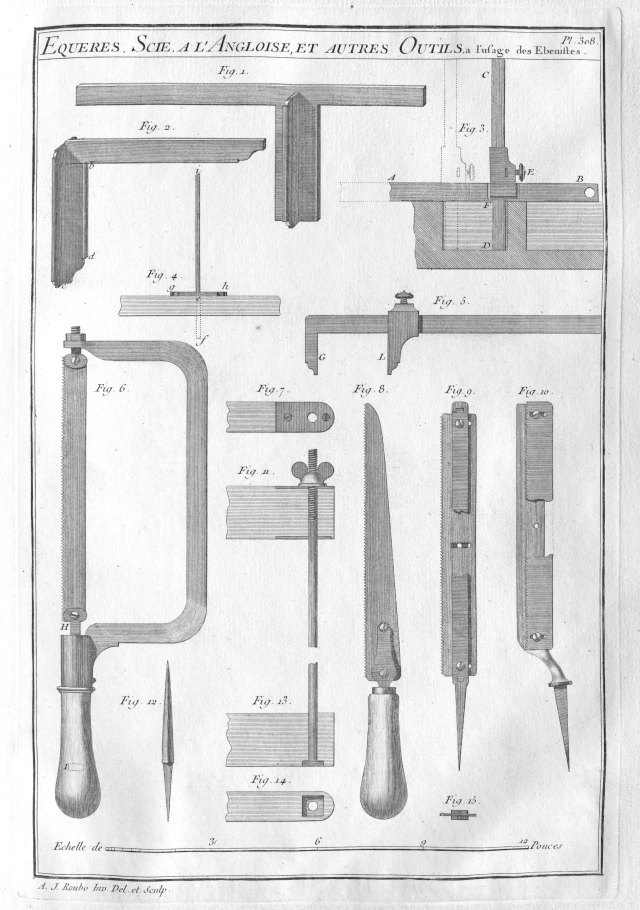
When the pieces are too small, or of a wood too hard to be planed ordinarily, that is to say, with bench [jointing] planes and other planes, after having sawn them, one squares them with rasps and Files of different types, as I will explain later. But whichever method the woods are dressed, the cabinetmakers use, for squaring them, the square made of ordinary wood. However, it would be good for the squares to be of iron or of brass/copper, named squares a chaperons [a square that has an applied fence/guide on its edge; a try square], of which one section is turned completely flat, and the other is perpendicular, like that of Fig. 2, where one would cut off part a–b–c–d, so that when orienting the square in whatever manner, the upper section is always perpendicular to the piece that one is working, as one can see in Fig. 4, where the upper section of the square, supposed to be c–f, is perpendicular to the other section, g–h, viewed from on end, in this Figure. These same squares could also serve to change direction one above the other, that is to say, the upper section above point i, and the other g–h, positioned flat on the work (see Fig. 4).
This square can also serve as an angle for drawing [laying out] the work, however it is constructed as I have supposed, or as it is represented in Fig. 2.
Figure 1 represents another type of square appropriate for marking right angles on different parts, where ordinary squares are not convenient to use.
The squares of which I just spoke cannot be used except for projecting angles [outside corners] and flat surfaces. As it sometimes happens, when one has cavities of a right angle to cut into the wood, like mortises or other works of this type, one uses for squaring them (or at least for verifying that they are pierced squarely) a square named squared cross, which is composed of two iron bars A–B and C–D [Fig. 3] ,of which the latter is set perpendicular to the first, with which it is stopped [locked] by the means of a screw E, such that this square serves at the same time to verify that the sides of the chopped [cut] holes are perpendicular to the surface of the work, and assures the evenness of depth. One lowers section C–D of the square, from F to D, of a length equal to the depth of the part which one wishes to excavate, as one can see in this figure, which I have represented by punctuated lines, the same square as the other side of the mortise.
Although I have not represented here anything but squares and right-angle triangles, it is however good to have miter squares, and bevel squares also of iron, for the reasons that I said above. If I have not illustrated them here, it is only in a desire to avoid repetitions, and to not multiply uselessly the figures, and by consequent, the Plates.
Figure 5 represents a type of square, or better said, the caliper for verifying at the same time that a piece is perfectly square and an equal thickness in all its parts, which is necessary, especially for the pieces which one squares with a File.
Marking gauges of iron are of a form a bit similar to that of Fig. 5, except that instead of the returning arm as in square G, their shank is terminated by a built-in point or by one added to the shank with a threaded screw, which is the same, as long as this point is made of hard steel and tempered, especially when one uses it for metals.
As I said above, page 810, Cabinetmakers use the same saws as other Joiners. However, for the works under question here, it is good that these saws, if they are the same, be made with a bit more care, and that their blades be tempered, so that they better withstand working hard woods. Since tempered saws require extreme stiffness, one would do well, instead of a cord/rope [to tighten the bow saw], to put there a rod of iron threaded at one end, to receive a winged nut by means of which on can tighten [tension] the saw blade to the degree that one judges appropriate. See Figs. 7, 11, 13 & 14.
It is necessary to take care that the bottom of this rod (whether of iron or of copper) be of a squared form, as well as the top section found immediately after the threading, so that it does not turn when tightening the winged nut. It is even good to fit the end of the arm of the saw, Fig. 11, with an iron plate which is pierced with a square hole through which passes the rod, as one can see in this figure.
Figure 6 represents a saw named the English Saw, of which the bow or frame is all iron. This saw is banded by means of a handle, which holds the end of the locking anvil H, which is held there by means of a screw I, a bit like the same manner as the marquetry saw of which is made the description on page 843. These sorts of saws work not only for all the little works, but also for cutting soft metals, like copper, tin, etc., as for the other materials that one uses in cabinetmaking. That is why it is always necessary that their blades be tempered.
Figure 8 represents a tool named a sawing Knife [keyhole saw], which differs from the hand saw (of which I spoke in the first part of my work, page 190) only by the size of the blade and the shape of its handle. This saw is very convenient for the small parts [and places] where one cannot use ordinary saws, and it is good that they are constructed like that represented in Fig. 8, so that one can change the blades when one judges appropriate.
Figures 9 & 15 represent another type of saw with a handle and a fence/shoulder, which cuts to only the depth that one judges appropriate [established by adjusting the fence/shoulder], and forms consequently, in many works, cuts of an equal depth. This saw is made of an ordinary blade, with a chassis or frame of iron, divided in two in its thickness, and where one of the parts enters in notches by its two ends in the part that is fixed and which, consequently, enters in the handle in a manner that they appear to be one part, the two parts are held together by means of three screws threaded in the fixed part of the frame, in the middle of which the saw is placed, being pierced itself by three corresponding slots and of a width equal to the diameter of the screw, in a way that one can lower or raise the blade as much as can be permitted by the length of the slots. Afterwards, one tightens the screw in order to hold the saw in place. See Fig. 9, where I removed the middle part of the frame, so that one can see the mortise of the blade, and consequently the results that can be had.
Figure 10 represents another type of saw with a guide/fence, where the frame is configured in a manner that one can adapt to it one or two saw blades, that is to say, one on each side. The frame of this saw enters into the first cut of the saw made previously in the work piece, and it can, as with the preceding one, serve not only to cut different pieces of the work, but also to make grooves of different depths or widths according to the thickness of the saws, in place of which one can use Floats, if one desires, especially for working hard woods, ivory, shell or other materials with which one wishes to make embellishments, by reason of which one will construct the tools you will need. Being content with the two examples that I just gave, which are, it seems to me, sufficient to help in composing the others, whether of a similar form, or laid out like tools with stock/body.
Figure 12 represents a Piercing tool. It is nothing but a point with a flattened shape, of which the exterior ridges are sharp and cutting [very similar to a die-maker’s scraper or a bird-cage awl]. This point serves to pierce little holes in pieces of thin wood, observing to position the widest part of the piercing tool perpendicular the grain line, so that these being cut present hardly any resistance to the point which is forced into the wood, which therefore diminishes the risk of splitting. The other small holes are pierced with an ordinary bit. When one fears that the pieces be too frail to tolerate the force of the latter, one pierces them with a Drill Bit, as I will explain here in speaking of the appropriate tools for piercing metals.
The tools that I just described (an abstraction made of those of Turning and Locksmithing of which I am going to speak later, and in general of all the tools of the Joiner of which I spoke in the course of this Work, which can work equally for the construction of cabinetry, which is the question here), are nearly always those which are the most useful. There are still many others that each worker makes for his own use, according to his talent and the different occasions which he has for using them with more or less success. Since most of these tools are little different from those of which I spoke in the description of the different types of Joiners, I believed to be able to dispense with entering into each detail on this subject, this information being otherwise inexhaustible.
As to the construction of solid cabinetry, it is the same thing as for the other types of joinery. The different parts which compose it are always tied one to the other by means of grooves and tongues, tenons, mortises and other assemblages [joinery]. The only difference is that of these different assemblages as well as all the rest of the construction of this joinery be made with all the perfection possible, that the fashioning of the wood, the joints and especially the assemblages, be made with the [best] precision, without being diminished in any manner so that when working on the joints they do not open/appear. I will not speak here of the quality of the wood, which should be perfect and dry as is possible; without which, whatever care one takes, one cannot do excellent work.