This is an excerpt from “The Essential Woodworker” by Robert Wearing.
The accurate sawing of tenons (Fig 119) is a vital skill. They should be sawn with confidence and should fit from the saw. To saw clear of the lines, for safety, is not recommended since whittling an overthick tenon to size is both more difficult and less accurate than sawing correctly in the first place. A 250mm (10in.) tenon or backsaw is the most commonly used for this purpose. Frame saws are used in Europe and by some workers in the USA, but they have never been popular in Britain since the manufacture of good-quality backsaws, and beginners usually find them rather clumsy.
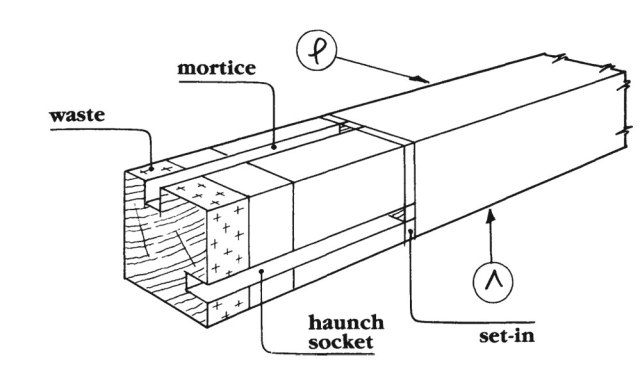
Before starting, check over the names of the parts on Fig 95 and shade in the waste. While there is little chance of throwing away the wrong piece, it is essential that the sawdust should be removed from the waste and not from the tenon. That is, the ‘kerf’ (the sawcut) should be in the waste and just up to the line. Beginners using the thick pencil aid in Fig 105 should saw away one pencil line and leave the other intact. The technique is not difficult if the following guidelines are followed: do not saw down two gauge lines at a time; do not saw to a line which is out of sight. (A modification to the saw is described in Appendix B.)
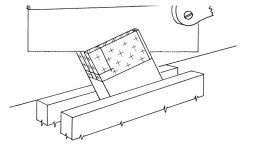
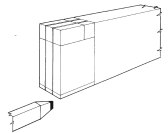
Start sawing always at the farther corner not the nearer one. Beginners may find it useful to chisel a triangular nick there to start the saw accurately (Fig 120). With the rail held vertically in the vice, start to saw at that far corner, slowly lowering the handle until a slot is cut about 3mm (1/8in.) deep (Fig 121). Now tilt the workpiece (Fig 122) and, keeping the saw in the slot, saw from corner to corner. Then turn the work round, or stand on the other side, and saw again from corner to corner, leaving an uncut triangle in the centre (Fig 123). Now grip the work vertically and, running down the two existing sawcuts, remove this last triangle, sawing down to the knife line, but no farther. Keep the saw horizontal (Fig 124).


If there is a set-in or haunch, saw this next. Repeat these stages on all the other tenons (Fig 125). The haunch may be sawn right off now or later.
Sawing the shoulder is most important as this is the piece left exposed. Except on wide rails, which may be planed, the shoulder should go up from the saw. Cramp to the bench, deepen the knife cut and chisel a shallow groove (Fig 126). Lay a very sharp saw in the groove and draw it back a few times to make a kerf, then saw off the cheek. Take the greatest care not to saw into the tenon (Fig 127), which would then be severely weakened. Should the waste not fall off, the cheek has probably been sawn with an arc-like motion, leaving some waste in the centre (Fig 128). Do not saw the shoulder deeper. Prise off the waste with a chisel, then gently and carefully pare away the obstruction. Saw off the haunch if not sawn previously.


Saw off the set-in with a little to spare, and trim this back to the knife line with a chisel only just wider than the tenon size. This avoids damage to the corner of the shoulder. Finally saw the mitre (Fig 129). The tenons should be lettered or numbered to identify them with their mortices.
— MB