This is an excerpt from “Doormaking and Window-Making” by Anonymous. This book was discovered for us by joiner Richard Arnold.
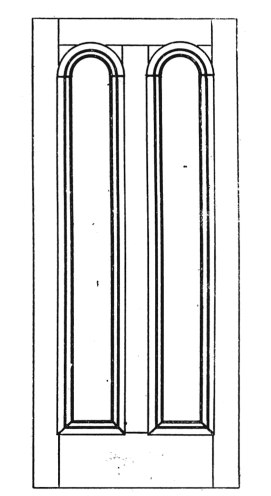
The door shown in Fig. 60 is very common as a front door in some parts of the country, although it has not much to recommend it, the long panels being very weak, and also the stiles, owing to there being no middle rail to strengthen them.
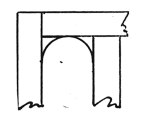
The making is very simple, being the same as an ordinary panel door, minus the middle rail; hence no detailed instructions on setting out are required here. They only mystifying point is the circular head panels, but those are only formed by the bolection moulding, the top rail being framed in square, as in Fig. 61, and the circular corner pieces glued and bradded in on the outside of the door only.
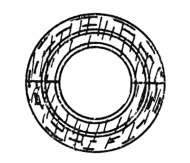
The circular moulding is formed in a lathe, as Fig. 62, and cut through to form two heads. It should be sawn through across the grain, as shown in the drawing, so that the end grain on the straight moulding will butt against the end grain on the circular moulding. In doing this, the shrinkage will be the same on each piece, and the intersection will not be affected. Of course, it must be understood that, if a good job is to be made, the turning must be accurately done, or the two will not intersect, and no amount of cleaning off will put matters right.
In making doors which have to be bolection moulded, some care is needed in gauging for the mortises, to ensure the moulding is bedding properly. If the moulding is rebated to a depth of half an inch, the gauge should be set to nine-sixteenths; the moulding will then bed tightly on the framing without any trouble. If gauged on too far, when the moulding is nailed in there is a risk of splitting at the outside edge; and if not gauged enough, the moulding will not fit closely to the framing. The medium should be aimed at, as in Fig. 63, where the moulding beds closely at A and B, and is slightly away from the panel at C.
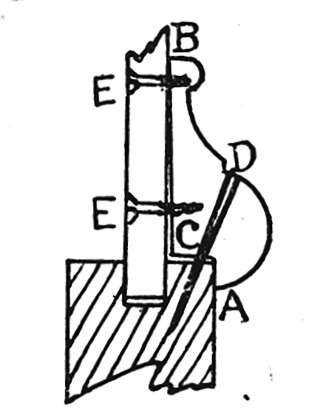
In fitting bolection moulding, the mites should be shot as it is difficult to obtain a clean joint direct from the saw; the correct length of each piece should be taken, and the moulding cut to the marks; there will be no difficulty in making them fit accurately. The rebates are usually made slightly edge-shaped, as shown in Fig. 63, which forces the mitres up tightly as the moulding are driven in. In nailing each piece in, the nails should be driven as at D (Fig. 63); this will draw the points A and B down tightly, and at the same time allow the panels to shrink, without the danger of splitting them. This method of fixing does not, however, find favor in some parts, the favorite method being to screw the moulding from the inside of the panels, as at E. This certainly holds them firmly to the panels; but unless the latter are very dry, they are apt to split, owing to the outside edges being held by the screws. Taken on the whole, the writer prefers the former method of fixing and it must be understood that both methods should on no account be used together.
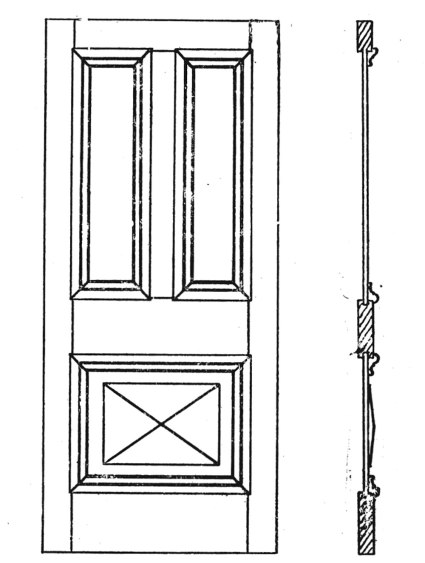
In Fig. 64 we have a door that will be a familiar object to some readers, but a total stranger to others: it is a bolection-moulded three-panel door, the third panel being formed by leaving out the bottom munition, and throwing the space below the middle rail into one panel. This, however, is relieved by planting on a raised panel of 3/4 in. wood, bevelled off from the centre to all four sides to a thickness of 3/8 and screwed to the panel proper from the inside. A vertical section of such a door is also shown, and an enlarged section of the bottom part appears in Fig. 65. In some cases a narrow raised panel in fixed to the upper panels in the same way as the lower, but this is not commonly done.

The above makes a very substantial good-looking door when finished, far better than that shown in Fig. 60; but to ensure lasting properties the bottom panels should be very dry, and the grain should cross in the two—that is, the panel proper should run longways, and the raised panel upright, or vice-versa.
— MB